Here is an update post to my level, a lot of the texturing is finalised, but I want to add some extra settings to my scene to make it stand out
 |
After colour grading |
 |
Before colour grading |
A way to enhance my scene was to create a custom colour LUT for my post process volume. Many of the filter I used were to enhance certain colours like green and red as well as desaturating the harsh oranges, I did this to make it look slightly older and make it look more period.
 |
Colour neutral LUT (Top) Custom LUT (Bottom) |
When modelling my books, I thought about having the text baked on to the meshes, but realising I could use mesh decals for the book text, I could unwrap planes on the spine of the book over a mesh decal sheet, which would give me the opportunity to have different shaped books as well as change the colour of the book without changing the colour of the mesh decals, changing the colour of the books would be another way to add variety to the scene, additionally having the extra different sized books helped the believability and not look blatantly instanced.
 |
Master material for book |
 |
Material instance controlling the parameter values of the book |
As a result of the material colour, I was able to uniquely apply more material instances to other books in the scene as they were all unwrapped on one UV sheet, which gave me the opportunity to make them, Red, Brown and Green respectively.
 |
Mesh decal unwrap |
Here is an example of the Mayan lettering system I used on the books, as well as the infamous Mayan calendar, which wasn't just a huge part of Mayan culture, but also part of ours, predicting the end of the world in 2012.
 |
Book with separate ID for book, paper and mesh decals |
By adding these callbacks on to the mesh decal texture, it made the books look authentic, not just because of the symbols, but also the author of the books.
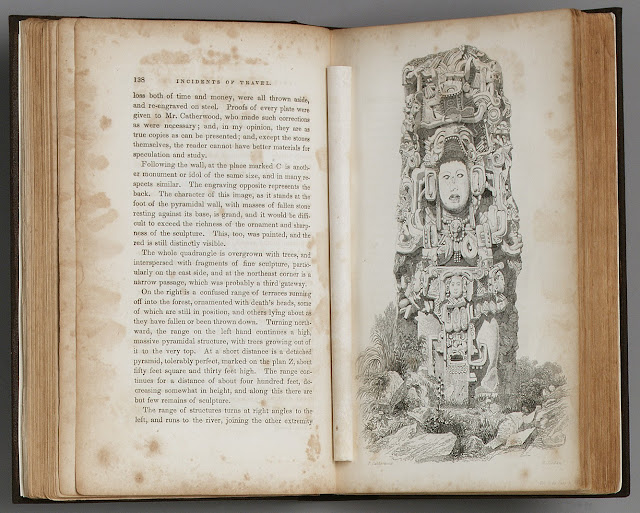
John Lloyd Stephens (or in this case, just Stephens) was an American explorer during the 1800s and discovered Mayan ruins in 1839, then published his books: Chiapas and Yucatan (1841) and Incidents of travel in Yucatan (1843)
 |
A passage excerpt and drawing from Stephens book 'Incidents of travel in Yucatan' |
Here is the textured map for the region, the left circle with a question mark denotes uncharted territory and predicting potential extent of Mayan Civilisation. The x spot is roughly the geographical location of Chichen itza, a preserved Mayan temple and the lines with a circle denotes the rough location of the border for Honduras and Nicaragua, which was the furthest extent south for the Mayan Civilisation.
After looking at my scene, I thought it would be a really cool idea to project the window shadows onto the desk.
I remember this because my Grandad had a window like this (Albeit much wider) and there was a shadow cast on the chairs beneath the window. A way I thought about doing this was to increase the intensity of the light, which did work, but of course, you couldn't see anything due to the sheer intensity of the light.
 |
Front room of my grandads old house. |
So what I did instead of increasing the light intensity was opt for the lighting card method. I stumbled across this randomly while looking in engine for solutions and from my understanding, light cards are essentially decals, but you can project them over emissive materials/make decals for emissive materials.
Here is an example of one of the two alphas I used for this effect. The other alpha is just the window, not with the machete silhouette inside it.
The way the lighting card works is the white bits project lighting, but the other bits are alphas, which retain the information from the underlying material/mesh (like how a normal decal with opacity functions.
 |
With lighting card |
 |
Without lighting card |
It is a subtle change and it does increase the shader complexity a bit, but the effect works for the scene, having a projection like this would really help for close ups and cinematics, adding to the overall ambience of the scene.
 |
Assets on lighting channel 0 and 1, affected by the directional light and point light |
 |
Light on lighting channel 1 |
A way to highlight props was to give them lighting channels. I did this with various assets in the scene, it was a good way of giving props depth but without showing terrible lighting complexity within the scene. So I decided to put assets on lighting channels like the example above.
 |
Example of the level lighting complexity |
 |
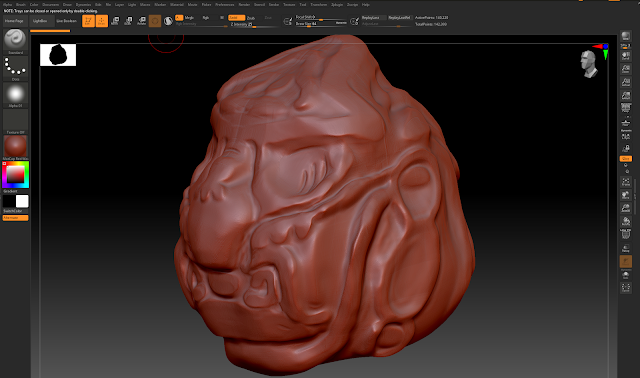
Mayan jade head sculpt using Zbrush |
 |
Jade head reference |
This is the Mayan head I sculpted inside of Zbrush, I used Zbrush as it has a more organic feel. Trying to capture the reference as much as possible. It isn't 100% accurate to the reference, however, not being 100% accurate to the reference is fine, because it isn't going to be animated and is going to be a static mesh, any person could have sculpted this in a number of different ways, making it more unique to the scene.
The texture also gave me a lot of options to add shaders, texture details, etc. Consisting of various features like subsurface, colour offset and noise filters. Overall there was room for experimentation, unlike other objects where it had to be objective, like wood, this asset could have a more subjective take, as long as the material was readable as jade, I could add my own details, like cracks or sculpt it how I wanted to as long as it was somewhat faithful to the reference.
 |
Analysing surface properties inside Substance Painter |
Here is an analysis breakdown of the head within substance painter, showing different elements of the texture that makes it readable as (Nephrite) jade/jadeite.
The texture is more consistent with Nephrite Jade as opposed to Jadeite Jade as both consist of different compounds - Nephrite jade is a more opaque and darker form of jade compared to Jadeite; Jadeite has more subsurface properties and is more luminous.
 |
Nephrite Jade VS Jadiete Jade - Gem Shopping Network - https://www.youtube.com/watch?app=desktop&v=r0oPwFeHwJY |


No comments:
Post a Comment