Module Navigation

Games Production: Professional Practice (Lighting Rig Reflection and feedback)

This post is to reflect on my Lighting Rig project.

Overall, this project has been challenging, mainly because it is a different workflow.

Here are some things I would have improved on given the opportunity.

  • Research of workflow (As mentioned in previous blog posts, it is difficult to see how something is made, because it is locked behind NDA or someone is unwilling to give feedback on the workflow. So knowing this, I would have tried to reach out to more people working at Cloud Imperium and asked them if they were able to provide me some information.)


  • Colour Coding mesh decals (I did add some material IDs to my mesh decals on the model as it helped me assign material instances to the decals in question, but I would have appropriately colour coded these mesh decals so I can apply the material instance with the correct colour to the mesh. I.e: Red material IDs with red mesh decals.)


  • Lighting Balance (After feedback, some things that were said to me is that the lighting was imbalanced in some areas. But this was mainly due to the working space/colour of my personal monitor and university monitor, both being calibrated on different colour spaces. Albeit, this wasn't really my fault, but for future reference, I will look at the project on other computers to see how the lighting looks and make relevant changes.


  • Re-arranging my prop UVs (At first I really didn't want to re-arrange my prop uvs as everything was fairly nicely unwrapped, but realising my secondary prop would add more to the scene, I instead tried to unwrap it to the best of my ability on the pre-existing unwrap, if time constraints were better, it would have been better to re-unwrap)


Here are some things that went well for this project.


  • The environment looks the part and holds up as something that could be part of Star Citizen, albeit in a very rudimentary fashion, as I would use more texture sheets for a full environment vs the limitations we had.


  • The rig is fairly well modelled and the decals applied to them add an extra layer of depth to the asset.


  • The texel density is broken down in a good way, I believe that the way I justified texture sizes really helped with the overall look of the level.
One piece of feedback that was given to me was the fact that my light rig looked a bit too clean, so the thing that was advised to do was to add some edge damage to the piece.
I did this via an edge damage decal atlas, which I applied to the edges of the mesh, pulling planes over the UV space, then assigning a material ID to the section allowed me to change the parameters within engine to match the surrounding colours.


Games Production: Professional Practice (Lighting Rig Finalisation)

This post is for the finalisation of the first professional practice brief.

I originally wanted to make windows for my scene so you could look out into space which would help cement the sci-fi theme. Furthermore, I thought it was a bit empty so I added a sun. This was going to be made in 3ds max, but realising I didn't have any more tri count for the scene, I decided to use the default sphere that comes with unreal.

Furthermore, I broke down the environment texel density to include the sun textures - https://www.youtube.com/watch?v=BAtUtTBs using this tutorial, it helped me create the sun in the background.

Furthermore, because we have to author the textures ourselves, I created the textures using substance designer and imported them into unreal.


Sun texture using designer

As to not make the sun look exactly like that in the tutorial, I went with something that was not only grounded, but contrasting. Because my interior is mainly orange, having a blue star like that of Sirius, it would provide some much needed offset and asymmetry. 

To finalise the LCD screen and make it look like an actual screen, I followed this tutorial. - https://www.youtube.com/watch?v=wIQrNJUhVjA

Then when applied to a material instance, I could change some of the settings and use the emissive as a mask to only be affected by the effect.


Initial high res screenshot


Render with photoshop post processing.

The original screenshot was quite dark, so in photoshop I boosted the brightness and lowered the contrast slightly, furthermore, I added light bloom around the lights using the vivid light blend mode to give the lighting a halo around it to fake the emissive without it being ruined by Unreal's post process volume.
I additionally added a colour LUT to the post process to enhance colours like previously mentioned, additionally including a selective colour, which helped me identify what colours to boost.

As some additional feedback, I was given advice about the scene, how it looks 'too dark' - furthermore, I was told it looked a bit bare.
So I went back to optimise my environment a bit more, by doing so, I was able to add a cylindrical mesh which would act like cable.
To keep within the tri count, I invested my time into looking at making a spline mesh to help with instancing within engine. This gave me the ability to create a cable within engine without affecting my tri count by individually modelling the entire cable in 3ds max.


Additional cables added via spline mesh


Spline mesh Blueprint construction script taken from this video by Ryan Laley - https://www.youtube.com/watch?v=eKIiWa19EMI


Working on feedback, I additionally added an extra prop, it was difficult to get around a UV problem. When I tried to re-import the mesh into substance painter, which included the new prop, I wasn't able to because of it being located on a drive that my PC didn't recognise. So as a work around, I textured the prop in a separate substance file, exported the textures, then I exported a 'render UVW template' from 3ds max, of which, I put in Photoshop and erased around the props to add the new prop to the sheet. 


Prop idea reference


Adding the new prop to the scene


Self Directed - Abbey Pumping Station Compositional Thumbnails

As Part of self directed, I went to abbey pumping station with the 2nd year students to draw on location and gather some photo texture reference.

Here are the compositional thumbnails I generated.

The purpose of this task was to see what interesting angles and objects I could include, it was about quick mark making to store enough information for future reference.


Games Production: Professional Practice (Week 4)

This week's focus was on finalising assets and the engine imports.

I have had issues with unreal 5 in the past, due to lumen not being compatible with screenspace effects by default, I felt like I lost control with some of my projects, however, I found out how you can re-enable the SSAO within the post process volume. Typing this command into the defaultengine.ini config file, I was able to regain control of the ambient occlusion.

r.Lumen.ScreenProbeGather.ShortRangeAO=0

Screenspace Ambient Occlusion now re-enabled in engine


Setting up emissive via material only on the Material IDs attached to meshes.


Rig imported into the level.


Rig animation test gif

Using the Level sequencer inside unreal, I was able to fulfil the implied functionality like in the concept that was provided in the brief.


Example of level sequencer with keyframes for animation loop


For the props, I was originally going to the crate on its own. Until a friend mentioned to me I could possibly do something on top of crates, so I opted for a bolt and spanner, which would act as narrative as if someone was helping to fix the rig with some old school equipment.
I managed to get all of these within budget of the required 2k tris for the narrative prop budget.


Prop modelling


Prop texturing


Prop UV unwrap sheet


Using the same principle as the lighting rig, I decided to bake some normals on to a plane and use this as the decal atlas for the environment.


This is how the normal map ended up coming out as when exporting from substance painter. I admit, this could have been a bit better optimised in terms of texture space. However, when I was making this atlas, I was looking at my references and there was only so much normal information I could pull out of them, which left some black spaces.

Additionally, I didn't want to fill up too much room as pulling a plane over an atlas can sometimes cause bleed because parts of the bake are too close together, resulting in unwanted overlap.


Floor texture inside Substance Designer

Going along with the consistent texel density, this floor texture I made in Designer came out as a 512.
When looking at my reference from Star Citizen, I saw a few references that had rubber style flooring.
I couldn't remember how to find/create a triangle inside of Designer, so I created a base rounded triangle inside of Photoshop, then imported it into Designer.

I plugged this into a tile sampler, which allowed me to make a pattern in the floor, I then dragged this directly in to the normals. I left the normal intensity as default, mainly because I would come back and edit the normals using the flatten normal node inside of Unreal.

Games Production: Professional Practice (Week 3)

This week I wanted to focus on texturing and start importing in to engine.
Last week I showcased the start of the rig and the baked normals I was going to use for the model.
I also broke down my textures into subsections, here are the textures that I ended up creating for the rig:

Base colour decal atlas (512) (Includes Base colour with Opacity)


Additional bump normal map for rubber (256) (Just Normal)


LCD Screen (512) (Includes Base colour, Channel pack and Emissive)


Metal Tiling texture (1024) (Includes Base colour, Channel pack and Normal)


Normal decal atlas (1024) (Includes Base colour with Opacity, Channel pack and Normal)


Additional scratch map (256) (Includes Base colour and channel pack)


Trim sheet (1024) (Includes Base colour, Channel Pack, Normal and Emissive) Including a base material of carbon fibre that was utilised from the substance painter library in conjunction with other normal maps


The idea behind some of these textures, most notably, the Base colour decal atlas, I left this white so I could control the colour inside of Unreal using a Constant 3 Parameter, this gave me the opportunity to change the colour from white to whatever I wanted when applied to the material instance.

Furthermore, I added material IDs to the mesh decals that I wanted to control with these parameters  (Most are colour coded).


For example, the green parts of the rig represent the green metal that would be applied to them. Not each part needed a material ID, but a lot of planning needed to be undertaken here to understand what would be most effective to transpose these materials inside unreal.


Often grouping material IDs for certain colours, like mentioned before was the easiest form of affecting the mesh inside engine.


My method was to unwrap the meshes on the required UV sheet within max, then apply a material ID to the specific part I wanted to alter or change colour of.


The same method was applied to the environment as well.

I made sure to colour code my mesh decals so I could apply a material instance to them when it came to finalising the mesh in unreal.

I also made sure to material ID the pipes, 1 would have an emissive (marked in blue) and another would be metal pipe which would change colour (marked in purple) this way I could change the colour of both materials and add an additional emissive boost on to the emissive to increase the brightness.

Material IDs/Colour shift in action after the fact:

Example of me changing colours via parameters


Base colour atlas material with albedo shift parameter


Normal decal atlas overlaid with the base metal texture, albedo shift and a normal intensity parameter


Plastic vinyl (from environment) connected to an albedo shift parameter


Self directed - Primary research texture gathering

This year I wanted to enhance my workflow, whether it is to speed it up or to help the texture quality.

I discovered the usage of substance sampler and how it can be utilised to create photoreal textures from images.


Here is an example of photo references I gathered, varying from bricks, to metal and pavement. It would be good to have a material library on hand as I can switch out the materials if needed.


Here is an example of me implementing one of my brick textures into the substance designer workflow, where it is accurate and photo-real, in addition, I can add more features to it within sampler, such as dirt, change the height and ao info. etc.

Games Production: Professional Practice (Week 2)

This week was the start of building the base assets.

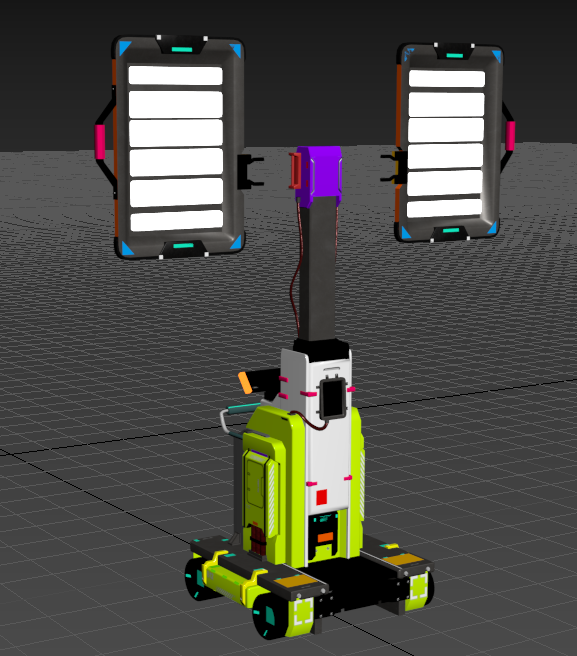
I went ahead and blocked out then refined the mesh, making sure to split the asset into the equal parts needed in order to fulfil the animation requirement.

Which meant I had to split the base, lifting section, 2 light arms and swing handles into separate assets.

When reaching out to my contact, they talked about how the workflow sometimes require modelling with ngons as hard surface modelling is easier to unwrap using ngon workflows, additionally it is easier to add weight faced normals to a mesh.

I started off with some ngon modelling, but then decided to triangulate the mesh, because auto triangulation could have gone wrong and resulted in incorrect shading on the model itself.

After the finalisation, I went around the model and started optimising and getting efficient optimisation edge loops to preserve my tri budget, because in theory, the more budget I had to play with, the more I could include on the model in terms of mesh decals.

There isn't much of an issue diverging too much from the original concept, as long as the base forms of the model are there, there wouldn't be problems adding additional surface details in terms of decals.

One problem that was encountered fairly early on was test runs of the rig, which resulted in the export of the model reverting to inches by default. 

It confused me at first because I was modelling in centimetres, but didn't realise why it was converting to inches, but then tweaked the export options to export as centimetres.


Environment:

After looking at some reference from Star Citizen that I previously gathered, I started building my environment.
I wanted it to be a space ship, corridor esque environment/diorama.
Giving callbacks and design features seen from the concept and game.


These pieces are all modular, being at 300x100, 100x100, 300x300 and 100x300 respectively, meaning they all snap in to place in unreal engine.
When doing this process I made sure to set my grid distance to a divisible number of 300, as 300 is the number I usually work with when constructing modular pieces.
In the end I went for a 25cm grid divide.

Mesh Decal Baking plane:


In preparation for the baking phase, I created a decal atlas for the normals, of which I would be assigning to the rig. This consists of some insets, bolts, handles vents, covers, etc. Which would add to the workflow and create some extra depth through these smaller details on the model

Overall this week has been a productive week, even though there were a few drawbacks including the previously mentioned units error, it has gone smoothly and I have been able to fit a lot of work into the sessions.

Games Production: Professional Practice (Captain's Table reflection)

This post if about the reflection of my Captain's table project. Overall, I enjoyed this project more than the light rig, as I feel like...