This week I wanted to focus on texturing and start importing in to engine.
Last week I showcased the start of the rig and the baked normals I was going to use for the model.
I also broke down my textures into subsections, here are the textures that I ended up creating for the rig:
 |
Base colour decal atlas (512) (Includes Base colour with Opacity) |
 |
Additional bump normal map for rubber (256) (Just Normal) |
 |
LCD Screen (512) (Includes Base colour, Channel pack and Emissive) |
 |
Metal Tiling texture (1024) (Includes Base colour, Channel pack and Normal) |
 |
Normal decal atlas (1024) (Includes Base colour with Opacity, Channel pack and Normal) |
 |
Additional scratch map (256) (Includes Base colour and channel pack) |
 |
Trim sheet (1024) (Includes Base colour, Channel Pack, Normal and Emissive) Including a base material of carbon fibre that was utilised from the substance painter library in conjunction with other normal maps |
The idea behind some of these textures, most notably, the Base colour decal atlas, I left this white so I could control the colour inside of Unreal using a Constant 3 Parameter, this gave me the opportunity to change the colour from white to whatever I wanted when applied to the material instance.
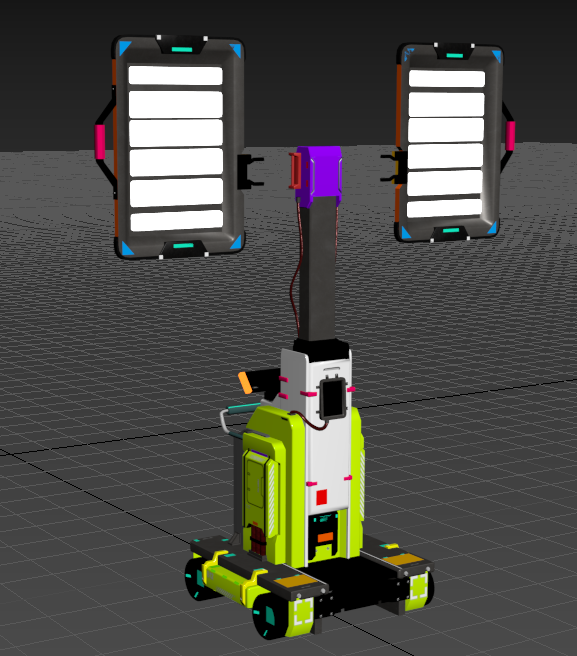
Furthermore, I added material IDs to the mesh decals that I wanted to control with these parameters (Most are colour coded).
For example, the green parts of the rig represent the green metal that would be applied to them. Not each part needed a material ID, but a lot of planning needed to be undertaken here to understand what would be most effective to transpose these materials inside unreal.
Often grouping material IDs for certain colours, like mentioned before was the easiest form of affecting the mesh inside engine.
My method was to unwrap the meshes on the required UV sheet within max, then apply a material ID to the specific part I wanted to alter or change colour of.

The same method was applied to the environment as well.
I made sure to colour code my mesh decals so I could apply a material instance to them when it came to finalising the mesh in unreal.
I also made sure to material ID the pipes, 1 would have an emissive (marked in blue) and another would be metal pipe which would change colour (marked in purple) this way I could change the colour of both materials and add an additional emissive boost on to the emissive to increase the brightness.
Material IDs/Colour shift in action after the fact:
 |
Example of me changing colours via parameters |
 |
Base colour atlas material with albedo shift parameter |
 |
Normal decal atlas overlaid with the base metal texture, albedo shift and a normal intensity parameter |
 |
Plastic vinyl (from environment) connected to an albedo shift parameter |


No comments:
Post a Comment