Module Navigation

Games Production: Professional Practice (Week 1)

This week we were given our briefs for professional practice.
I wanted something familiar, but not something too straining, so I picked the Cloud Imperium Lighting Rig.


I managed to get hold of individuals of who work at Cloud Imperium and asked them about the workflow as a form of research, given that searching online can lead to many dead ends, especially if the workflow is specific and people aren't allowed to talk about it due to NDA.


Due to confidentiality, I will not be naming who has told me parts of the workflow, but I can discuss the workflow I will be using that is relevant for the project.
The research I gathered lead to the workflow using tiling textures, although I was told, typically many 2048 textures would be used on a single mesh, due to the limit in texture budget for the brief, I decided to plan my texture breakdowns for the Rig.


Thinking about the tiling texture I would use, what I could add to a trim sheet and the other parts of the workflow which consists of mesh decals, both for albedo and normals.
'The normal decals are what gives the model the hard surface look, along with the 'face weighted normals' is what would be used to describe adding detail to the model without baking.
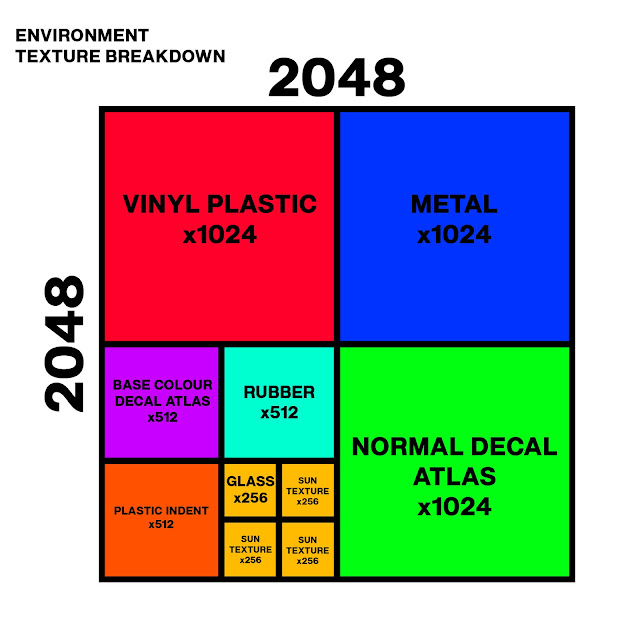
So I have broken down my texture sheet as so:

I was told that it would be impossible to create the entire model from a single 2048.


The brief confused me by saying 1 2048 per texture, did this mean for example, 1 rubber texture, 1 metal texture? etc.


But after clarification, it was indeed for all the texture sub breakdowns, i.e: Base colour, Normal, Channel pack.


So I decided to break up my textures like the picture above.
It made the most logical sense to do it based on texel density, so keeping larger pieces, such as the metal (which is the bulk of the asset) at 1024 was the way to go. Furthermore, I was told that having the normals at a higher density is more important than the base colour decal atlas because thats where the majority of the high level detail comes from.


Here is some reference I gathered to help me with this project, there were clearly very prominent colours, most notably red and orange.
In conjunction with having cooler colours contrasting with warmer ones.
This gives a clear indication as to what to use within the level, whether it is mesh decals, how to operate the chamfer modifier/face weighted normals etc.


The textures confused me for the environment too, thinking how could I create a whole environment from a 2048?
I originally intended on unwrapping the whole scene on a 2048, which could have worked If it was well packed, but after re-reading the workflow, I decided to stick to the texture breakdowns.
This made sense, because Star Citezen has a lot of interchangeable parts, colours etc, in order for the workflow to be easily replicated throughout the scene. (found using this method of modular parts for the spacecraft - https://youtu.be/yP94JhrNHYc?si=8VjPXJxg7n_oVeun)
I also considered using a trim sheet for the environment, but realised this wouldn't work for the final piece, due to the texture scrunching and being squished at edges, which would have produced unnecessary texture warping.


Example of my texel density breakdown for the environment:

On my original design idea, I wanted to include a window for the environment, furthermore, having an intractability feature, where you could see a rotating sun outside the window to add some sense of asymmetry.

Much like the rig breakdown, I kept the normal decal atlas as a higher percentage so I could create some additional depth to the scene.

No comments:

Post a Comment

Games Production: Professional Practice (Captain's Table reflection)

This post if about the reflection of my Captain's table project. Overall, I enjoyed this project more than the light rig, as I feel like...